|
【入門】STM32F103C8——新建模板工程 |
 一派掌門 二十級 |
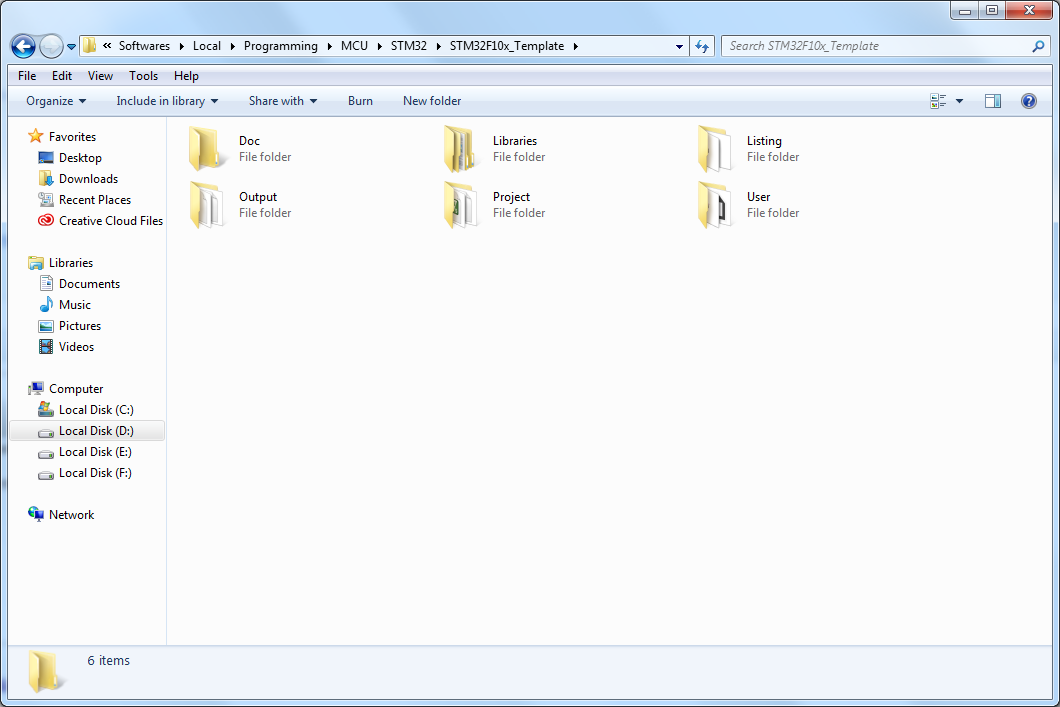
標準庫的下載請參閱:https://zh.arslanbar.net/post.php?t=24014 新建工程的步驟請參閱: http://jingyan.baidu.com/album/454316ab7ad711f7a7c03a1a.html?picindex=3 建好的工程:  |
 一派掌門 二十級 |
 工程建好後大約是21MB,還是挺大的。。。。
|
|
 一派掌門 二十級 |
【文件夾列表】
└─STM32F10x_Template 工程根目錄
├─Doc 用於存放各種說明文檔
├─Libraries 用於存放各種庫文件
│ ├─CMSIS
│ │ └─startup
│ └─FWLIB
│ ├─inc
│ └─src
├─Listing 用於存放編譯時產生的中間文件
├─Output 用於存放生成的下載所需的文件
├─Project 用於存放工程文件
│ ├─DebugConfig
│ ├─Listings
│ └─Objects
└─User 用於存放用戶文件,即我們自己編寫的各種源文件
|
|
 一派掌門 二十級 |
【文件列表】
└─STM32F10x_Template
├─Doc
├─Libraries
│ ├─CMSIS
│ │ │ core_cm3.c
│ │ │ core_cm3.h
│ │ │ stm32f10x.h
│ │ │ system_stm32f10x.c
│ │ │ system_stm32f10x.h
│ │ │
│ │ └─startup
│ │ startup_stm32f10x_cl.s
│ │ startup_stm32f10x_hd.s
│ │ startup_stm32f10x_hd_vl.s
│ │ startup_stm32f10x_ld.s
│ │ startup_stm32f10x_ld_vl.s
│ │ startup_stm32f10x_md.s
│ │ startup_stm32f10x_md_vl.s
│ │ startup_stm32f10x_xl.s
│ │
│ └─FWLIB
│ ├─inc
│ │ misc.h
│ │ stm32f10x_adc.h
│ │ stm32f10x_bkp.h
│ │ stm32f10x_can.h
│ │ stm32f10x_cec.h
│ │ stm32f10x_crc.h
│ │ stm32f10x_dac.h
│ │ stm32f10x_dbgmcu.h
│ │ stm32f10x_dma.h
│ │ stm32f10x_exti.h
│ │ stm32f10x_flash.h
│ │ stm32f10x_fsmc.h
│ │ stm32f10x_gpio.h
│ │ stm32f10x_i2c.h
│ │ stm32f10x_iwdg.h
│ │ stm32f10x_pwr.h
│ │ stm32f10x_rcc.h
│ │ stm32f10x_rtc.h
│ │ stm32f10x_sdio.h
│ │ stm32f10x_spi.h
│ │ stm32f10x_tim.h
│ │ stm32f10x_usart.h
│ │ stm32f10x_wwdg.h
│ │
│ └─src
│ misc.c
│ stm32f10x_adc.c
│ stm32f10x_bkp.c
│ stm32f10x_can.c
│ stm32f10x_cec.c
│ stm32f10x_crc.c
│ stm32f10x_dac.c
│ stm32f10x_dbgmcu.c
│ stm32f10x_dma.c
│ stm32f10x_exti.c
│ stm32f10x_flash.c
│ stm32f10x_fsmc.c
│ stm32f10x_gpio.c
│ stm32f10x_i2c.c
│ stm32f10x_iwdg.c
│ stm32f10x_pwr.c
│ stm32f10x_rcc.c
│ stm32f10x_rtc.c
│ stm32f10x_sdio.c
│ stm32f10x_spi.c
│ stm32f10x_tim.c
│ stm32f10x_usart.c
│ stm32f10x_wwdg.c
│
├─Listing
│ project.map
│ startup_stm32f10x_hd.lst
│
├─Output
│ core_cm3.crf
│ core_cm3.d
│ core_cm3.o
│ main.crf
│ main.d
│ main.o
│ misc.crf
│ misc.d
│ misc.o
│ project.axf
│ project.build_log.htm
│ project.hex
│ project.htm
│ project.lnp
│ project.sct
│ project_Target 1.dep
│ startup_stm32f10x_hd.d
│ startup_stm32f10x_hd.o
│ stm32f10x_adc.crf
│ stm32f10x_adc.d
│ stm32f10x_adc.o
│ stm32f10x_bkp.crf
│ stm32f10x_bkp.d
│ stm32f10x_bkp.o
│ stm32f10x_can.crf
│ stm32f10x_can.d
│ stm32f10x_can.o
│ stm32f10x_cec.crf
│ stm32f10x_cec.d
│ stm32f10x_cec.o
│ stm32f10x_crc.crf
│ stm32f10x_crc.d
│ stm32f10x_crc.o
│ stm32f10x_dac.crf
│ stm32f10x_dac.d
│ stm32f10x_dac.o
│ stm32f10x_dbgmcu.crf
│ stm32f10x_dbgmcu.d
│ stm32f10x_dbgmcu.o
│ stm32f10x_dma.crf
│ stm32f10x_dma.d
│ stm32f10x_dma.o
│ stm32f10x_exti.crf
│ stm32f10x_exti.d
│ stm32f10x_exti.o
│ stm32f10x_flash.crf
│ stm32f10x_flash.d
│ stm32f10x_flash.o
│ stm32f10x_fsmc.crf
│ stm32f10x_fsmc.d
│ stm32f10x_fsmc.o
│ stm32f10x_gpio.crf
│ stm32f10x_gpio.d
│ stm32f10x_gpio.o
│ stm32f10x_i2c.crf
│ stm32f10x_i2c.d
│ stm32f10x_i2c.o
│ stm32f10x_it.crf
│ stm32f10x_it.d
│ stm32f10x_it.o
│ stm32f10x_iwdg.crf
│ stm32f10x_iwdg.d
│ stm32f10x_iwdg.o
│ stm32f10x_pwr.crf
│ stm32f10x_pwr.d
│ stm32f10x_pwr.o
│ stm32f10x_rcc.crf
│ stm32f10x_rcc.d
│ stm32f10x_rcc.o
│ stm32f10x_rtc.crf
│ stm32f10x_rtc.d
│ stm32f10x_rtc.o
│ stm32f10x_sdio.crf
│ stm32f10x_sdio.d
│ stm32f10x_sdio.o
│ stm32f10x_spi.crf
│ stm32f10x_spi.d
│ stm32f10x_spi.o
│ stm32f10x_tim.crf
│ stm32f10x_tim.d
│ stm32f10x_tim.o
│ stm32f10x_usart.crf
│ stm32f10x_usart.d
│ stm32f10x_usart.o
│ stm32f10x_wwdg.crf
│ stm32f10x_wwdg.d
│ stm32f10x_wwdg.o
│ system_stm32f10x.crf
│ system_stm32f10x.d
│ system_stm32f10x.o
│
├─Project
│ │ project.uvguix.Octopus
│ │ project.uvoptx
│ │ project.uvprojx
│ │
│ ├─DebugConfig
│ │ Target_1_STM32F103C8.dbgconf
│ │
│ ├─Listings
│ └─Objects
└─User
main.c
stm32f10x_conf.h
stm32f10x_it.c
stm32f10x_it.h
|
|
 一派掌門 二十級 |
從標準庫里複製過來的文件其實不超過2MB:  主要是因為編譯時在Output文件夾中產生的文件太大了:  |
|
 一派掌門 二十級 |
只需在選項裏面預定義一個宏:USE_STDPERIPH_DRIVER 無需定義STM32F10X_HD,否則編譯時會出錯  下面的Include Paths有4個文件夾。 |
|
 一派掌門 二十級 |
|
|
 一派掌門 二十級 |
最後要把main.c裏面原有的內容全部刪掉 寫上自己的代碼:  最後編譯成功。 |
|
 一派掌門 二十級 |
在工程中添加文件時只需要添加c文件和s文件,頭文件(*.h)無需添加進去。
|
|
 一派掌門 二十級 |
【總結】 新建工程時,標準庫中需要複製的文件所在目錄如下:  |
|
 一派掌門 二十級 |
【測試程序】
#include "stm32f10x.h"
// 延時函數
void delay()
{
uint32_t i;
for (i = 0; i < 4000000; i++);
}
int main(void)
{
GPIO_InitTypeDef init;
RCC_APB2PeriphClockCmd(RCC_APB2Periph_GPIOB, ENABLE); // 開啟PB口的時鐘
// 初始化PB8和PB9
init.GPIO_Pin = GPIO_Pin_8 | GPIO_Pin_9;
init.GPIO_Speed = GPIO_Speed_50MHz;
init.GPIO_Mode = GPIO_Mode_Out_PP;
GPIO_Init(GPIOB, &init);
// 循環點亮PB8、PB9
while (1)
{
GPIO_WriteBit(GPIOB, GPIO_Pin_8, Bit_RESET);
GPIO_WriteBit(GPIOB, GPIO_Pin_9, Bit_SET);
delay();
GPIO_WriteBit(GPIOB, GPIO_Pin_8, Bit_SET);
GPIO_WriteBit(GPIOB, GPIO_Pin_9, Bit_RESET);
delay();
}
}
|
|
 一派掌門 二十級 |
STM32F10x Standard Peripherals Library 參考手冊網頁版: http://stm32.kosyak.info/doc/index.html |
|
 一派掌門 二十級 |
【測試程序2:共陰數碼管顯示12345678】
#include "stm32f10x.h"
#define _BV(n) (1 << (n))
uint8_t segdisp[] = {0xc0, 0xf9, 0xa4, 0xb0, 0x99, 0x92, 0x82, 0xf8, 0x80, 0x90}; // 共陽數碼管段碼表,取反後就是共陰的段碼
int nDigit = 0;
// 延時函數
void delay()
{
uint32_t i;
for (i = 0; i < 20000; i++);
}
int main(void)
{
GPIO_InitTypeDef init;
RCC_APB2PeriphClockCmd(RCC_APB2Periph_GPIOA | RCC_APB2Periph_GPIOB, ENABLE);
// 初始化PA和PB
init.GPIO_Pin = GPIO_Pin_All;
init.GPIO_Speed = GPIO_Speed_50MHz;
init.GPIO_Mode = GPIO_Mode_Out_PP;
GPIO_Init(GPIOA, &init);
GPIO_Init(GPIOB, &init);
while (1)
{
GPIO_Write(GPIOA, ~_BV(nDigit));
GPIO_Write(GPIOB, ~segdisp[nDigit + 1] << 8);
delay();
nDigit++;
if (nDigit > 7)
nDigit = 0;
}
}
|
|
 一派掌門 二十級 |
【測試程序3:二進制加法】
#include "stm32f10x.h"
uint8_t uState = 0;
void delay()
{
uint32_t i;
for (i = 0; i < 2000000; i++);
}
int main(void)
{
GPIO_InitTypeDef init;
RCC_APB2PeriphClockCmd(RCC_APB2Periph_GPIOB, ENABLE);
init.GPIO_Pin = GPIO_Pin_All;
init.GPIO_Speed = GPIO_Speed_50MHz;
init.GPIO_Mode = GPIO_Mode_Out_PP;
GPIO_Init(GPIOB, &init);
while (1)
{
GPIO_Write(GPIOB, uState << 8);
delay();
uState++;
}
}
|
|