
作者共發了23篇帖子。
[使用方法]ATtiny13A芯片的使用方法
 |
首先,祝賀我成功地點亮了LED燈!
|
|
 電路: 第1腳接正常的AVR RESET電路,和ATMega16一樣,電容10μF。 第3腳通過一個200歐姆的電阻接發光二極管的正極。 然後按照ATMega16的電路圖接上ISP下載口。 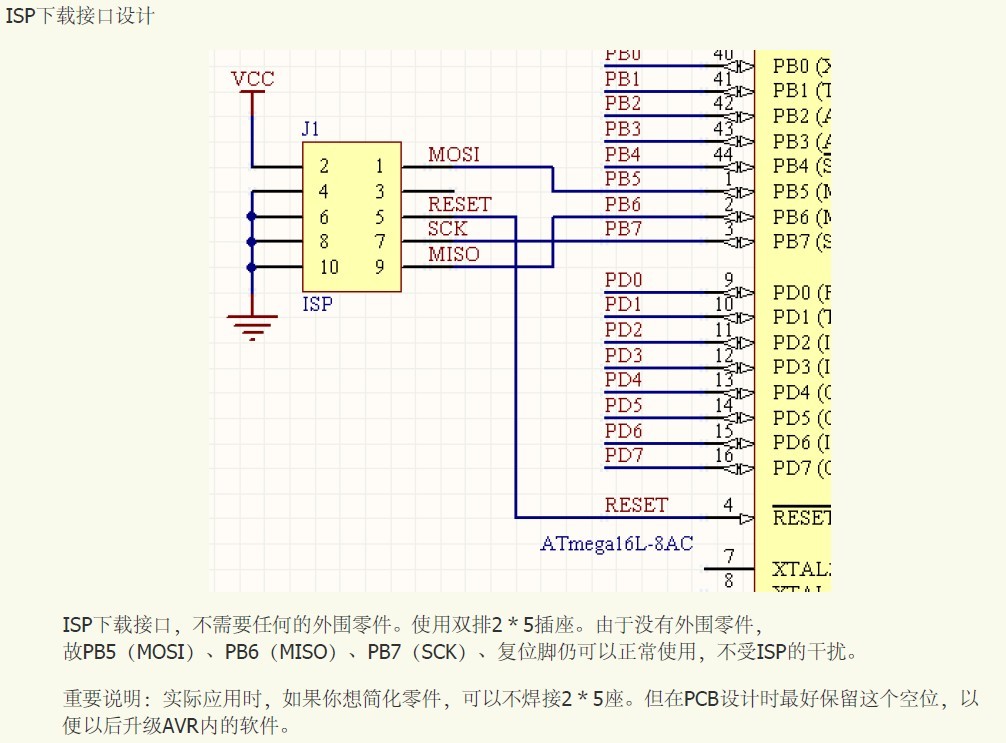 |
|
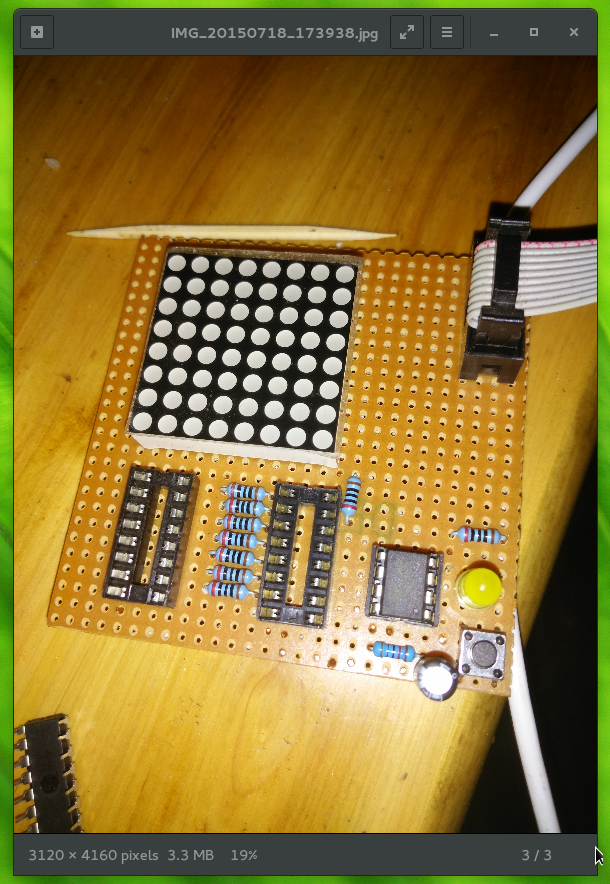 如圖,插好USBASP。圖中的兩個HC595和一個8x8LED不用管,我以前就焊好了。 |
|
然後編寫一個C文件,文件名tiny.c:
#include <avr/io.h> #include <avr/eeprom.h> int main() { DDRB |= _BV(4); //把PB4設置為輸出 PORTB |= _BV(4); //把PB4設置為高電平 eeprom_busy_wait(); eeprom_write_byte(0x00, 0xa5); eeprom_busy_wait(); eeprom_write_byte(0x01, 0xb6); eeprom_busy_wait(); eeprom_write_byte(0x02, 0xc7); eeprom_busy_wait(); eeprom_write_byte(0x03, PORTB); eeprom_busy_wait(); eeprom_write_byte(0x04, DDRB); eeprom_busy_wait(); eeprom_write_byte(0x05, PINB); eeprom_busy_wait(); while (1); } 為了方便起見,筆者是在Linux下用的avrdude+gccavr進行編譯的程序。在Windows平台上和WinAVR等價。用ICC AVR的話就得把頭文件改了,還要把_BV改成BIT。 |
|
Makefile:
# make tiny.hex: tiny.c avr-gcc -mmcu=attiny13 -Wall -Os tiny.c -o tiny.o avr-objcopy -j .text -j .data -O ihex tiny.o tiny.hex # make run run: tiny.hex sudo avrdude -p t13 -c usbasp -e -U flash:w:tiny.hex |
|
在終端中執行make run(也可以先make後make run),把程序下載到芯片中。程序的運行結果是:LED亮了!
 |
|
同時,程序運行後獲得的EEPROM內容如下:
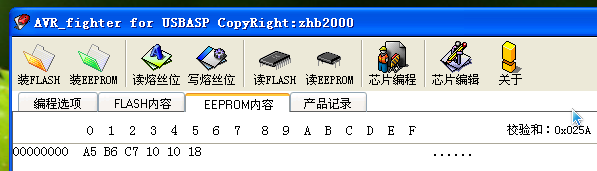 這說明, PORTB = 0x10 (00010000) DDRB = 0X10 (00010000) PINB = 0x18 (00011000) |
|
PORTB = 0x10 (00010000)
左邊第一位是PB7(當然ATtiny13根本沒這個端口) 左邊第4位就是PB4,PORTB中只有這一位為1 右邊最後一位是PB0 |
|
現在刪掉EEPROM部分的代碼。
#include <avr/io.h> int main() { DDRB |= _BV(4); //把PB4設置為輸出 PORTB |= _BV(4); //把PB4設置為高電平 while (1); } 程序運行結果:LED亮 #include <avr/io.h> int main() { DDRB |= _BV(4); //把PB4設置為輸出 PORTB &= ~_BV(4); //把PB4設置為低電平 while (1); } 程序運行結果:LED滅 |
|
令我奇怪的是,之前不能運行的以下程序:
#include <avr/io.h> int main() { DDRB = 0xff; PORTB = 0xff; while (1) { PORTB = 0xff; } } 現在居然又能正常運行了。。。我靠!所以這個原因暫時還沒找到。。。 |